 |
 |
|
|
|
|
Contributed by: Council of Chief State School
Officers (CCSSO)
Welcome to this experimental science test. We hope that you will
find it interesting and worthwhile. Carefully read through these
directions and the directions on the next page before you begin
to work. You may be part of a group for the first part of this exercise.
Each group should carry out the experiment and collect the data
together, but each student must record the data in his or her own
booklet. Be sure to record the data exactly as you observe them.
After the data have been collected, each student should answer the
questions independently. After you have finished your experiment and have recorded all
of the data, you will be asked to answer some questions about the
experiment and the data you recorded. Your answers must be written
in this test booklet in the space provided. Make sure that you understand
each question before you begin to write. At any time while you are
writing your answers, you may look back at the directions for the
experiment and the data you collected. Be sure that your answers
are written as clearly and neatly as possible. Before you turn the page, read the list of materials
given below and check to make sure that your group has everything
listed.
Electric Switch Your lab team has been hired to help remodel a house so people
who do not have the use of their hands will be able to turn the
lights on and off. For the device to work you will need to:
Step 1. Make sure you can light a bulb. Use the materials you have been given to create the circuit shown
in the diagram.
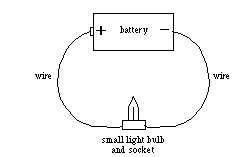
Figure 1 Does the light bulb light? If it does not, check to be sure that
you have constructed the circuit properly and ask your teacher to
make sure that your bulb and battery are working. Step 2. Build a switch. A switch is a device that can be used to connect
and break the circuit so that the bulb will turn off and on. Once
the bulb in your circuit lights, use the materials you have been
given to create a switch. Work with your switch until you can use
it to turn the light bulb on and off. Add the switch to the circuit.
Each member of the group should draw a diagram of the circuit
in his or her own booklet. In your drawing, you must show all parts
of the circuit and the switch. Each of the parts must be clearly
labeled. When you have finished your drawing, return to your
desk to finish Question 1 and work on Question 2.
Questions Please answer the following questions by yourself. 1. Draw your circuit and switch. Explain how the switch
works. 2. Now figure out how you could change the design of the
switch so that a person without the use of his or her hands could
use it. Draw a diagram of your circuit showing the changes to the
circuit and switch that would allow a person to turn it off and
on without the use of hands. In your drawing, you must show all
parts of the circuit and the switch. Each of the parts must be
clearly labeled. Explain how this switch works. |